My Amiga 3000 Build Part 3
This is final part (Part 3) of my Amiga 3000 build. Please read Part 1 and Part 2 first if you haven't read them yet - I am continuing on directly from Part 2 and assuming you have read it already.
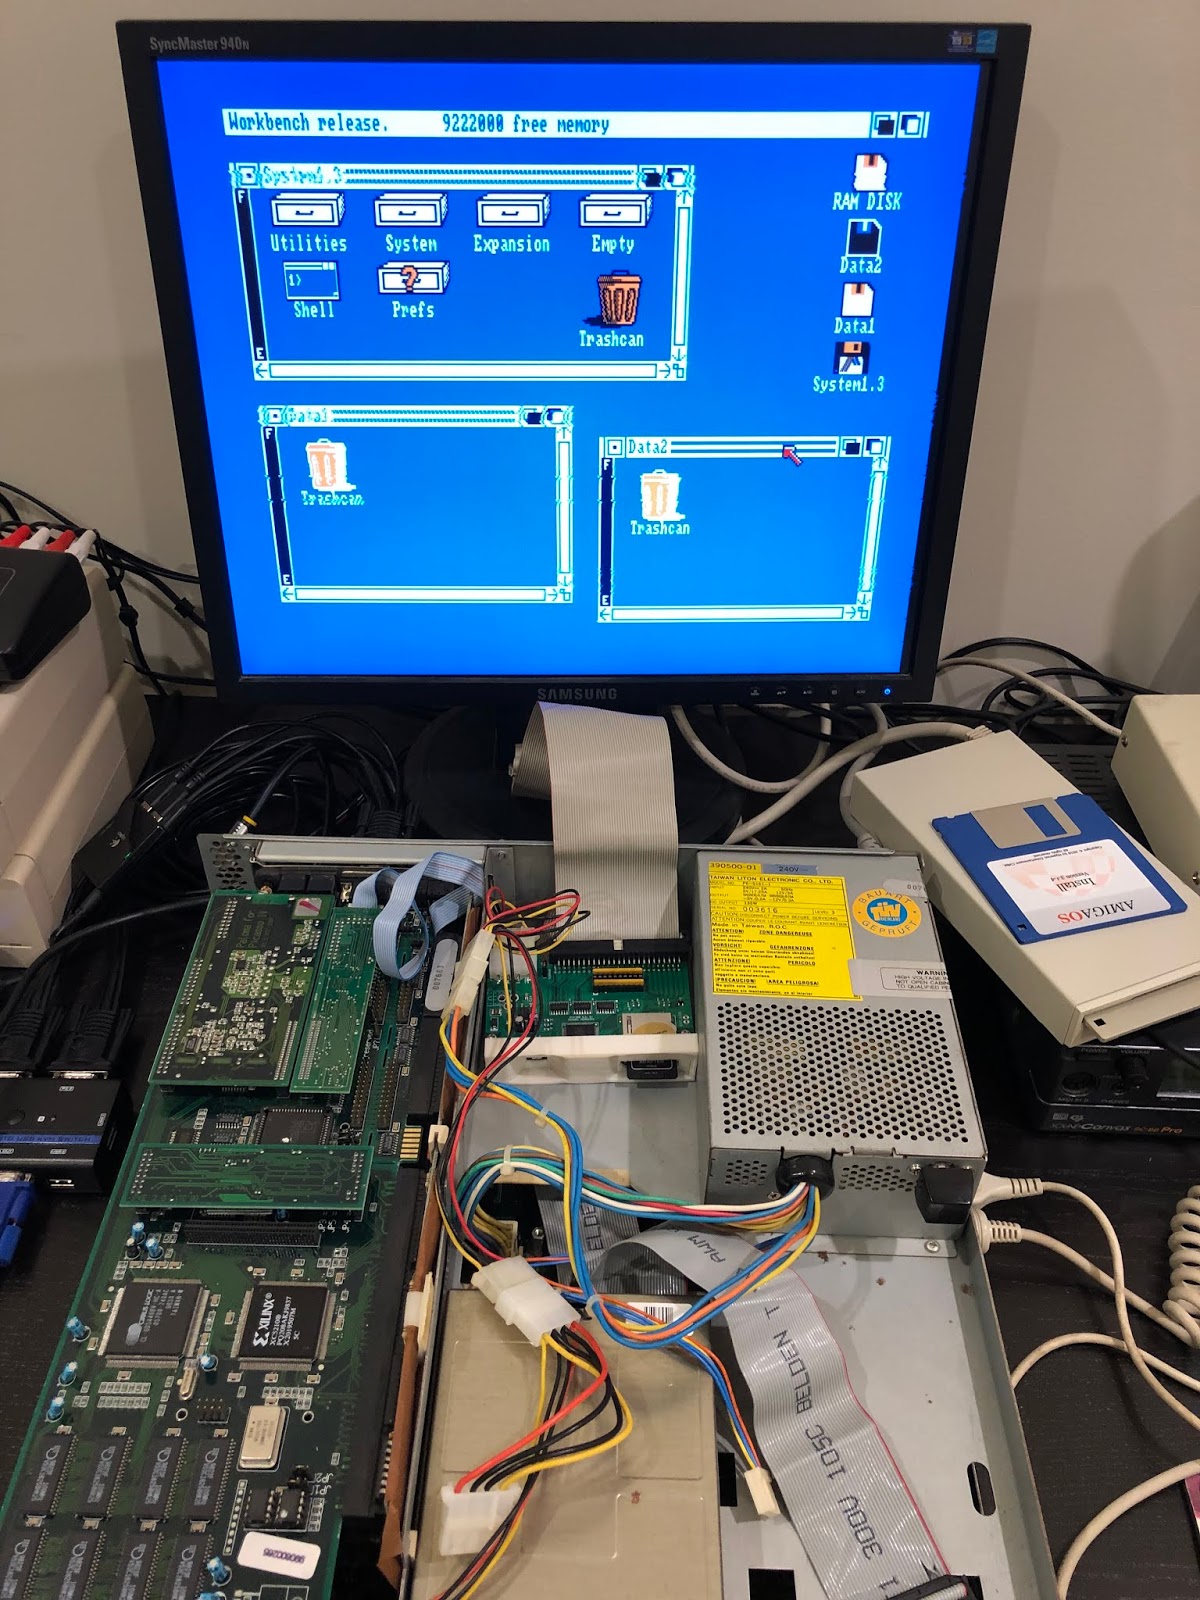
Where I left things in Part 2 was planning to install AmigaOS 3.1.4 (creating a superkickstart file with bonus code to use the superkickstart 1.4) and also install a SCSI2SD to replace the 52MB SCSI hard disk I used in Part 1 while trying to sort out why the SCSI2SD didn't work...
To facilitate AmigaOS 3.1.4, I really need to sort out the 52MB scsi hard disk. This is because it has very little space to fit AmigaOS 3.1.4 on it. Another reason is because I want to keep my working setup built in Parts 1 and 2 separately, and then add a new build based on SCSI2SD.
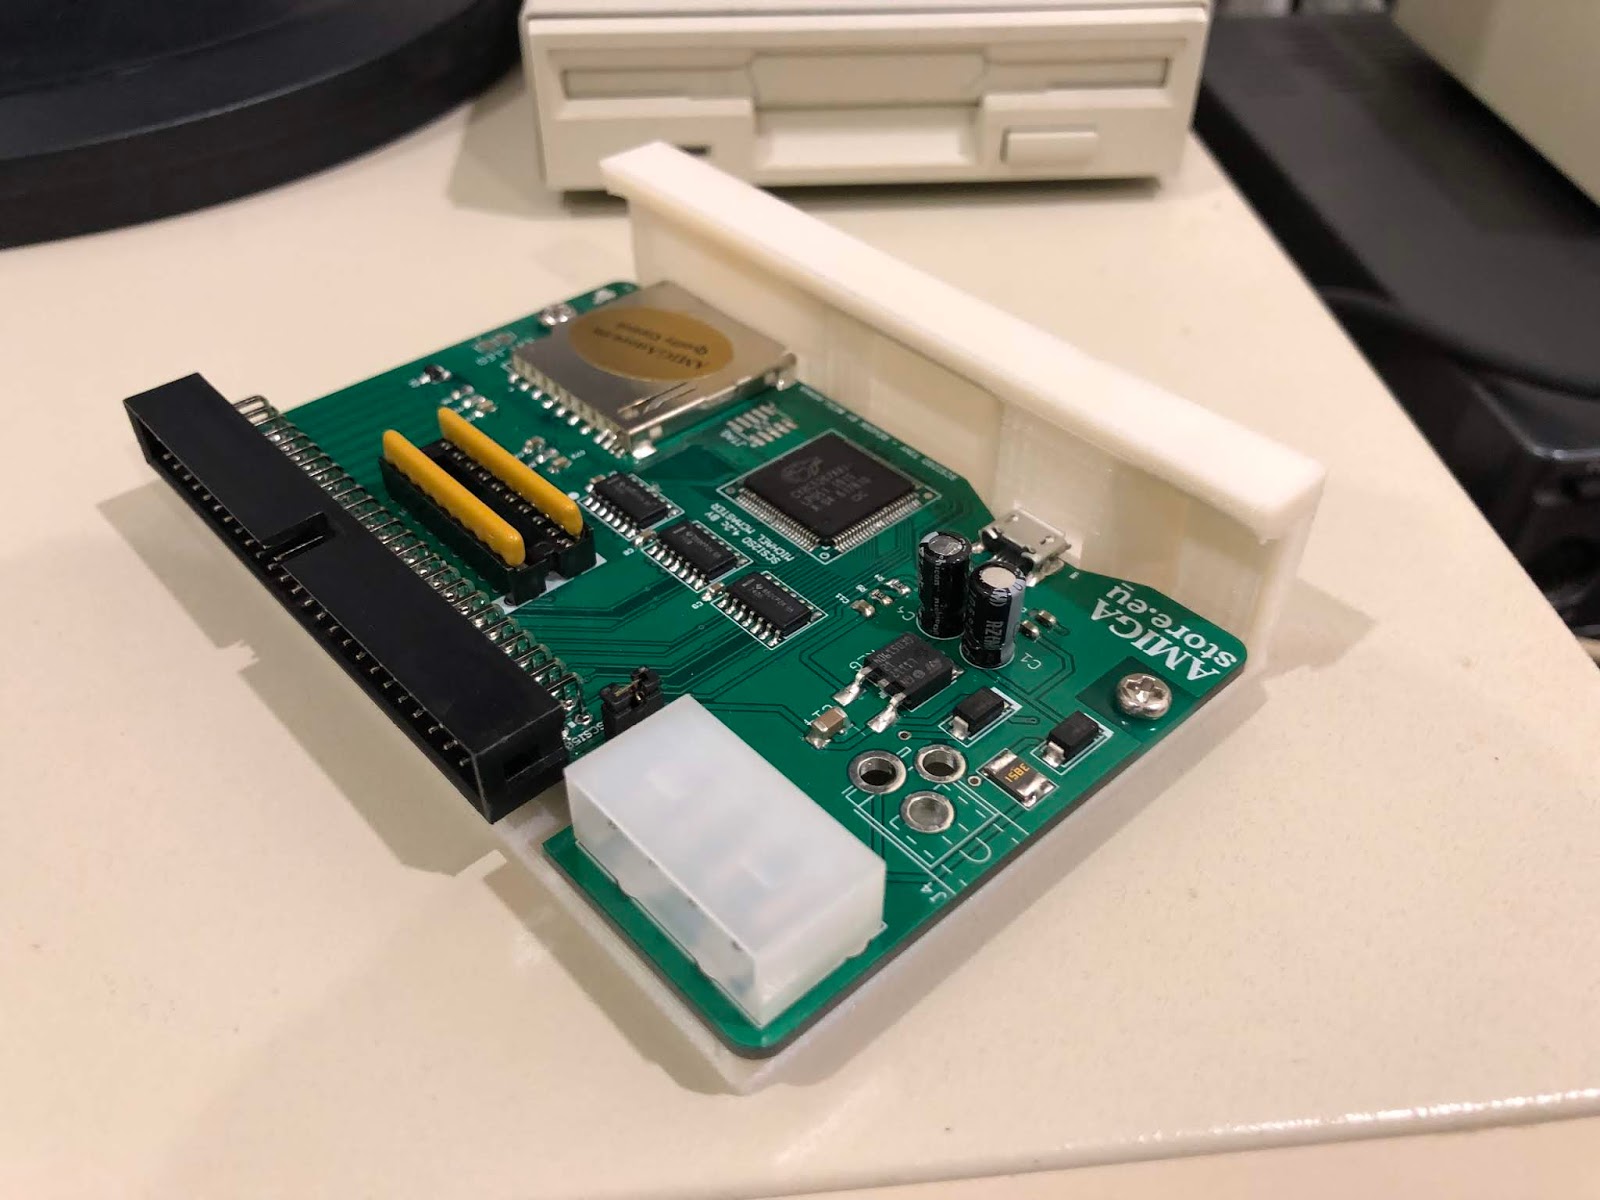
AS readers will know, the SCSI2SDv6 and Aztecmonster SCSI cards I have didn't work correctly. To get started with this I bought a new SCSI2SD with a 16GB MicroSD card (with SD Card converter in included). This came from Amigastore.eu with a 3D printed 3.5 inch drive bay enclosure to fit into the front bay of an Amiga 2000 or 4000. Unfortunately not so useful on the A3000...but no worries, this thing is going inside the A3000 anyway for now.

Closer look at the SCSI2SD and 3D printed enclosure:

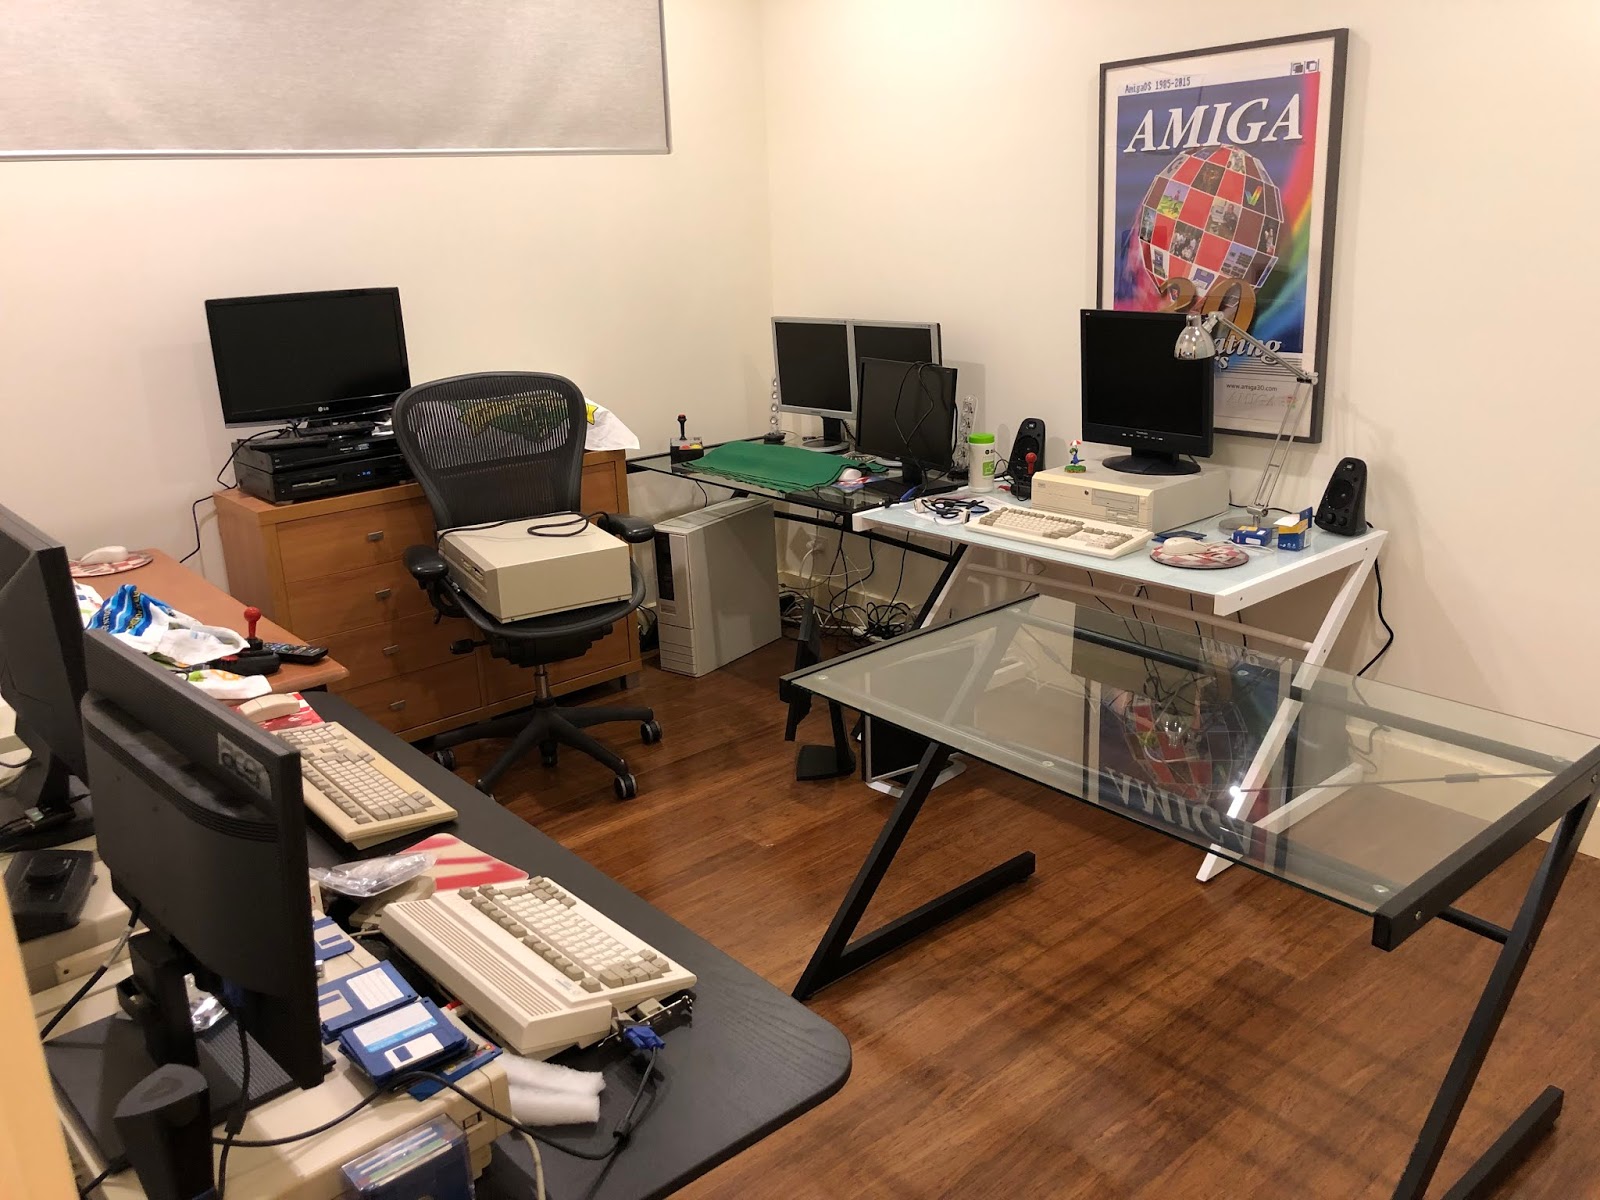
The problem was that the Amiga 3000 purchase meant the A2000 no longer had a space to setup, and the A600 never did in the first place (it was set up in front of the A1000 temporarily while building).
The new desk solves that issue. I moved the A600 and A1200 together on the new (old) desk, and moved the A2000 to where the A1200 was before. Now all the systems are setup in the room - here is the A600/A1200 setup:

Anyway, let's move back to the A3000 build, since it now has it's permanent home!
I received the AmigaOS 3.1.4 roms and instructions in the post. I registered the roms on Hyperion's website so that I could download the kickstart rom file for the A3000. Because the A3000 rom configuration has two configurations (single combined rom file and two individual rom files for the actual two roms), I want to get the single kickstart rom file for the A3000.
With that done, the next step, as mentioned in Part 1, is to attach the Bonus code to the Kickstart 3.1.4 A3000 file. As done in part 1, I used the MacOS X terminal to "cat" the bonus code to the file. (Please see part 1 for the exact command to use)
As a reminder, this step needs to be done because the bonus code is needed by the Superkickstart 1.4 in the A3000, and must be located in the WB_2.x drive as Devs:kickstart so the A3000 can boot from it.
With the superkickstart 3.1.4 file now created on the Mac, I copied it via usb stick to my A4000D, and as per Part 1, used Makesuperdisk to write out the 3.1.4 superkickstart file (and 1.3 superkickstart file created in part 1) to a floppy disk for use on the A3000:

This means that when I hold down both mouse buttons on the A3000 during power on, I can select to boot from the 2.X superkickstart floppy. And I happy to report it booted and worked first time, displaying the AmigaOS 3.1.4 kickstart screen:


So with that working, we can move onto the next step - prepping the new SCSI2SD hard drive for use in the Amiga 3000.
I need to setup the SCSI2SD to define the scsi devices to be available on the new MicroSD card. I decided to use my Linux Core i7 PC to do this bit.

I installed the SCSI2SD control software from here and then ran it and connected the SCSI2SD via USB cable to the PC.
The device was detected by the SCSI2SD-util software. I then selected to import the current configuration from the SCSI2SD card.
Amigastore.eu had already prepped the MicroSD card as a single 4GB partition running AmigaOS 3.1 (Cloanto) with license key, as below. However, this configuration can't be used with the Superkickstart as it can't "see" past the 2GB barrier:

So we need to setup a 2GB SCSI drive (for locating the WB_1.3 and WB_2.x partitions to be visible to superkickstart 1.4), and then a larger drive using the remaining 14GB to use with AmigaOS 3.1.4, which will be visible once the AmigaOS 3.1.4 superkickstart is loaded. Makes sense? Ok, great!
I then modified it as below. I deactivated Device 1, and I then set up one SCSI drive with ID6, with 2GB size on device 2:

I also set up a second SCSI drive on ID4, 14GB size, to use the remaining MicroSD space:

Last, but not least, We need to make sure the Enable SCSI2 mode is selected in the General tab. This is needed to work properly on the Amiga 3000. Make sure the SCSI terminator is enabled also.

I then saved the settings back to the MicroSD card:

With that done, I disconnected the SCSI2SD from my Linux PC and connected it to the Amiga 3000 internal SCSI port, replacing the 52MB SCSI hard disk:

For data transfer purposes, I kept the Buddha IDE CF card in the system at this time, but as mentioned, initially it won't be seen by the A3000 superkickstart 1.4 until AmigaOS 3.1.4 superkickstart is loaded.
I used the Superkickstart 3.1.4 to boot AmigaOS 3.1.4 kickstart from on the A3000 initially, and then booted from the AmigaOS 3.1.4 install disk to Workbench.
From there, I ran the HDToolbox on the install disk to prep the partitions. As mentioned we need to keep the superkickstart 1.4 visible partitions wb_1.3 and wb_2.x under the 2GB barrier.
The previous 52MB SCSI disk left me very little space for the AmigaOS 1.3 and 3.1 installs. Fortunately with 2GB to play with we can be a lot more generous. Since the AmigaOS 1.3 partition will be running my old A2000 workbench partition, I want to have more space for more demos, mods and games under 1.3.
I think 512MB should be enough for WB_1.3, set as bootable, with lower priority 0, since I want the 3.1.4 partition to have priority on normal booting, with the option to boot 1.3 as desired. Fastfilesystem must be used with no international mode or cache set, 512k block size:
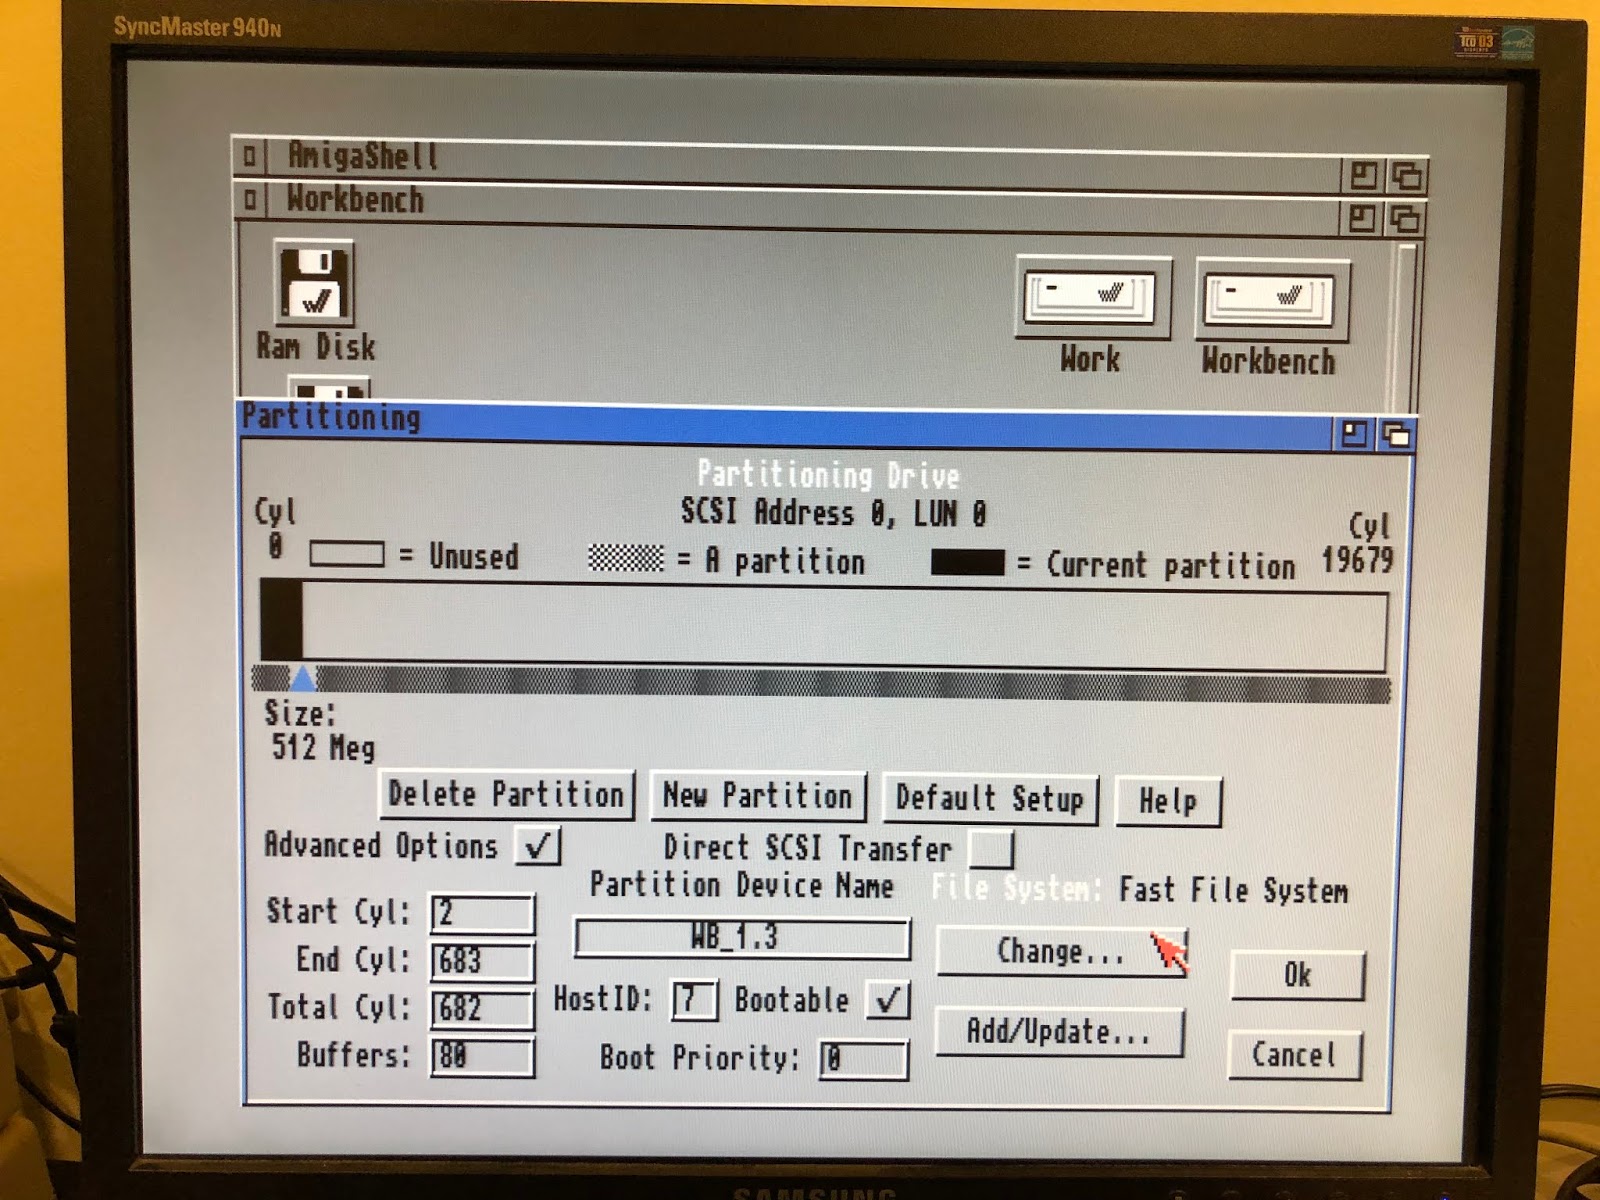
Next up I did the WB_2.x partition for AmigaOS3.1.4. This partition has a higher priority booting so it will always boot on power on by default. As with the WB_1.3 partition, the WB_2.x needs to be fastfilesystem with no international mode or caching set, 512k block size:

This leaves me 512MB to reach to the 2GB barrier for the superkickstart 1.4 (and AmigaOS 1.3). I decided to use the 512MB left as a shared data partition called HD0, non-bootable. As per the others it has fastfilesystem and no international mode or caching, 512k block size.

This HD0 data share drive is very important for data transfer to AmigaOS 1.3 from AmigaOS 3.1.4. This is because AmigaOS 1.3 can't see those partitions beyond the 2GB barrier.
When booting from AmigaOS 3.1.4 using superkickstart the wb_1.3 partition is automatically hidden, so we can't copy any files to it from AmigaOS 3.1.4. By using the data share drive here I can copy to that drive from AmigaOS 3.1.4 (which will have USB support, networking and other goodies), and then boot AmigaOS 1.3 to see it and transfer it where needed - or just leave it there (the more likely scenario as I am lazy!)
Beyond the 2GB barrier I can do what I like, so the rest of the disk is prepped as a 2GB fastfilesystem partition (HD1) and a 10GB Fastfilesystem partition (HD2) with a 4096 block size. This block size minimum is needed for larger partitions like this otherwise the system will take 10 minutes to validate the partition on boot up each time!


With the drives prepped, setting saved to the drive in HDToolbox and a mandatory reboot later using the AmigaOS 3.1.4 Install floppy disk, we see the new partitions ready for formatting:

I formatted WB_1.3 as System1.3, and WB_2.x as System3.1.4. I am pleased to saw that unlike Part 1 with the SCSI2SD v6, with the new SCSI2SD device the format worked fine! Great news, we are in business!
I formatted HD0 as Data1, HD1 as Data2, HD2 as Data3 (expect to change this later).
Next I copied the commands I needed from the AmigaOS 3.1.4 Workbench floppy disk to RAM: so I could copy the superkickstart files from floppy disk to the DEVS drawer without having to swap disks all the time. I created the Devs drawer in System1.3 and System3.1.4 partitions and copied the respective superkickstart files from floppy disk to the respective devs drawer for each:

I then powered off, and powered on, holding both mouse buttons down. I wanted to check that the superkickstarts were correctly located on the partitions, and that I could boot 1.3 or 3.1.4 kickstarts from hard disk now - good start, the hard drive option for both is not greyed out:

However, when I selected WB_2.x, I quickly realised I forgot an important step...

Superkickstart 1.4 doesn't like the fastfilesystem version from AmigaOS 3.1.4. It is too new for it. I hit this problem back in Part 1 too and I am a bit annoyed at myself for forgetting it!

Anyway, I reverted to an older Workbench 2.0 kickstart (as I did before), so I can boot the Workbench 2.0 install disk and run HDToolbox to change the fastfilesystem. Yes, on reflection I probably could have done it from 3.1.4 too. Not sure why I did it this way, but I did probably because it worked when I prepped the 52MB drive...

As mentioned, I inserted a Workbench 1.3.2 floppy disk with an old fastfilesystem version and then deleted the newer one from the SCSI HD RDB and replaced it with the old version instead:

That done, I also copied the Workbench 1.3.2 floppy disk to the System1.3 partition, and then powered off. I powered on, held both mouse buttons and select WB_1.3 to boot from. Now it works:
Interestingly, AmigaOS 1.3 can see the 2GB Data2 partition I created up to the 4GB barrier. So it seems it is only superkickstart that can't see beyond 2GB. Interesting...anyway, makes data transfer that much easier!
Now, next I want to install AmigaOS 3.1.4 on the A3000, so I boot from superkickstart 3.1.4 floppy disk (not the hard disk since it is not installed on it yet), so I can start the installation:

The install proceeds as per the normal AmigaOS 3.1.4 installation that I have covered in previous builds on the A600 and A500.
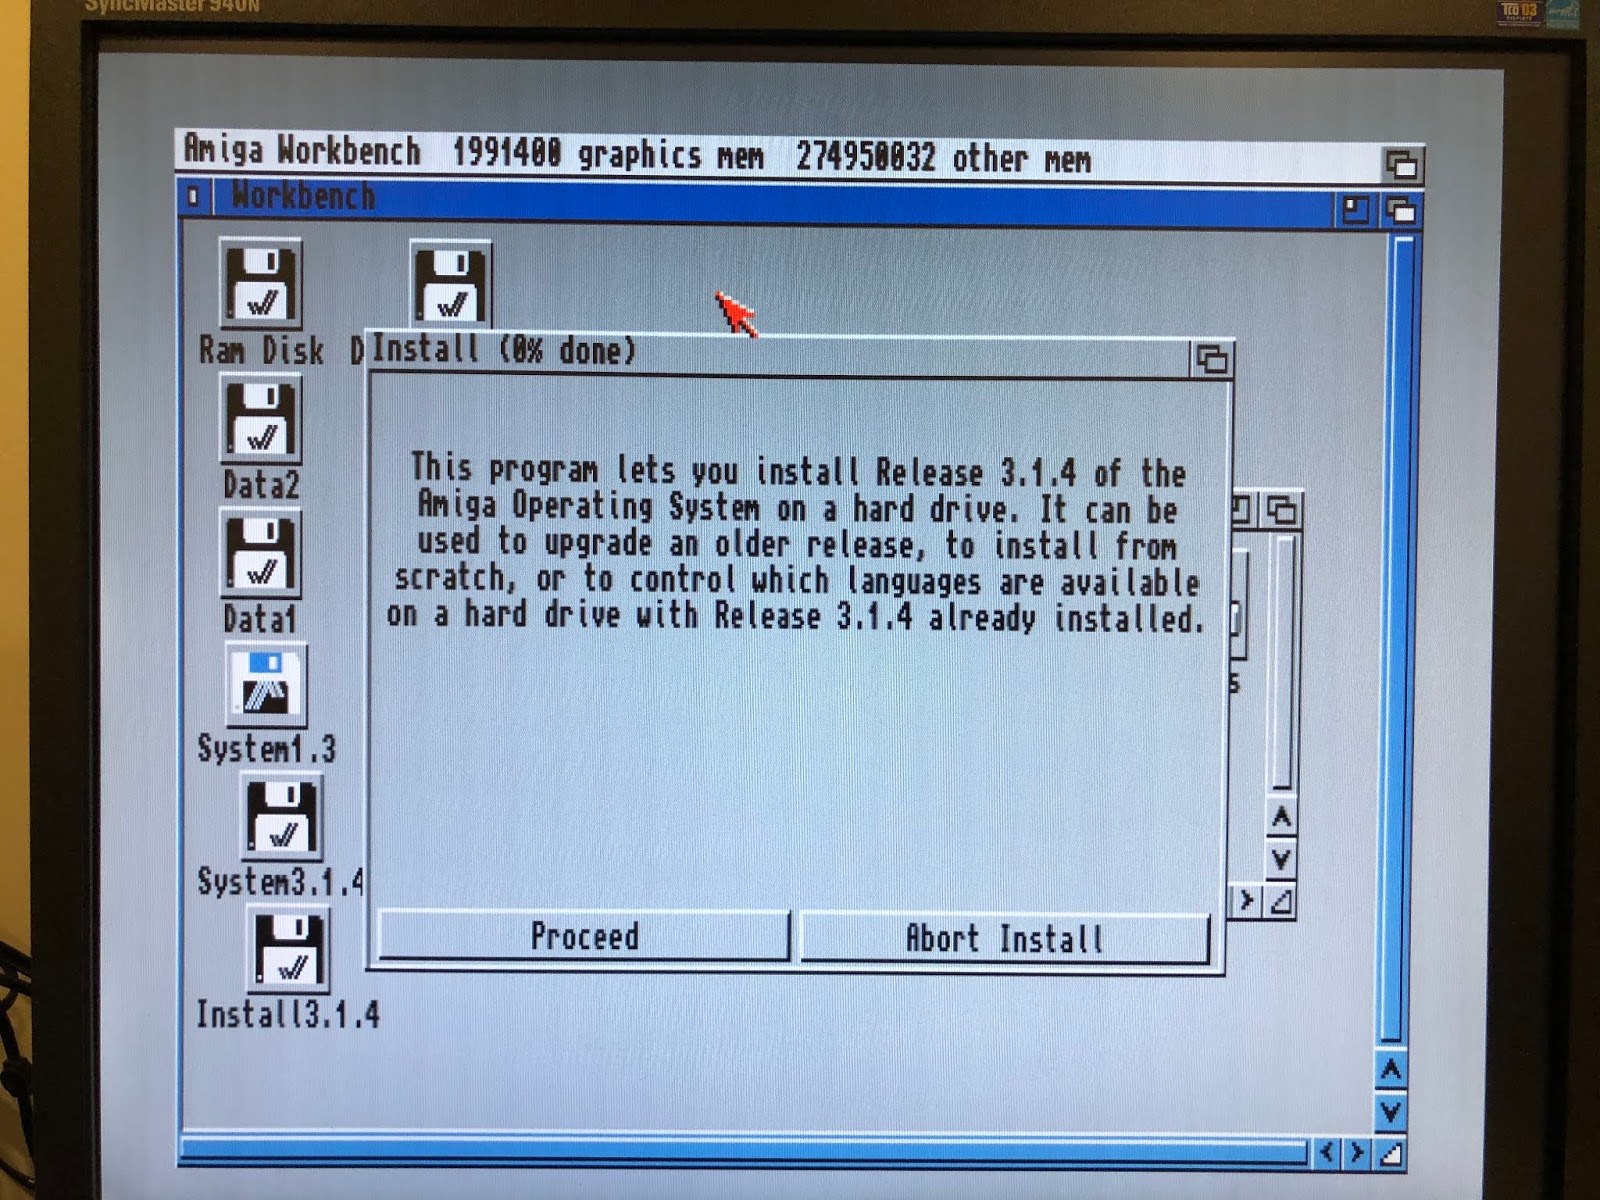
I select the System3.1.4 partition to install the OS to:

I then swap out the disks as needed to install:

Install done, ready for reboot!

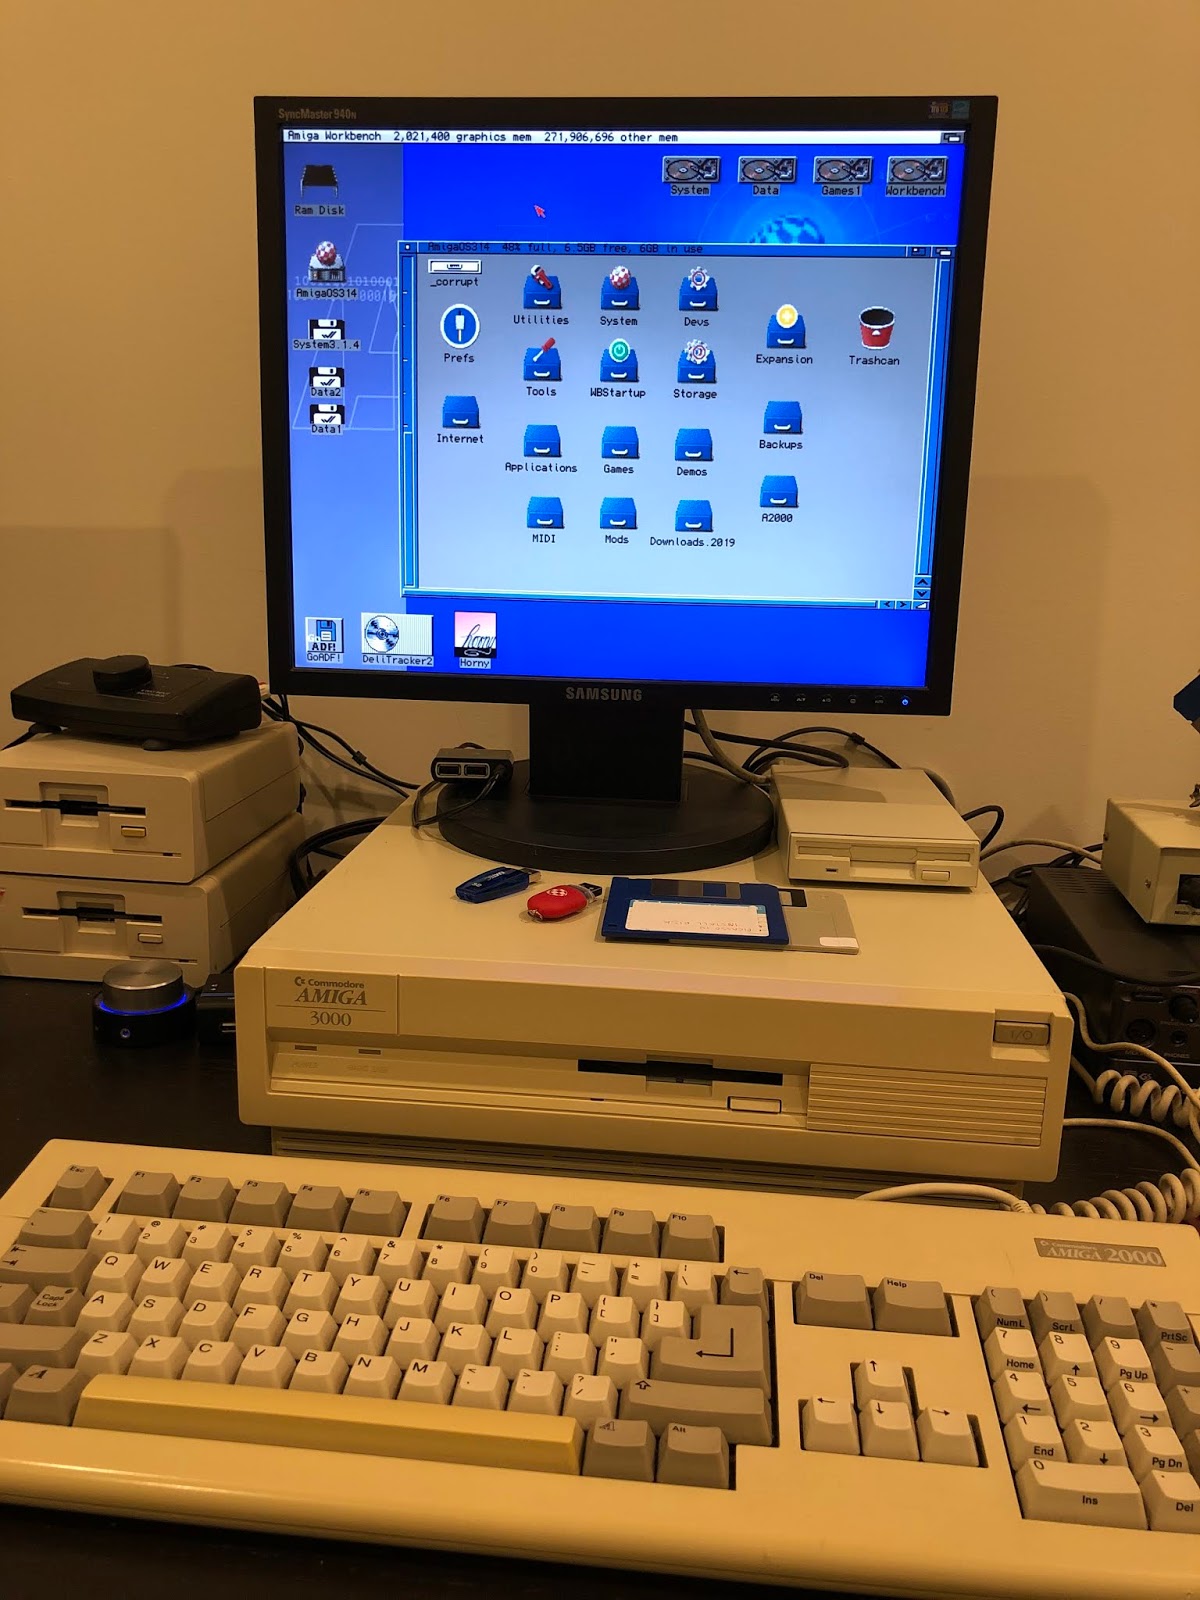
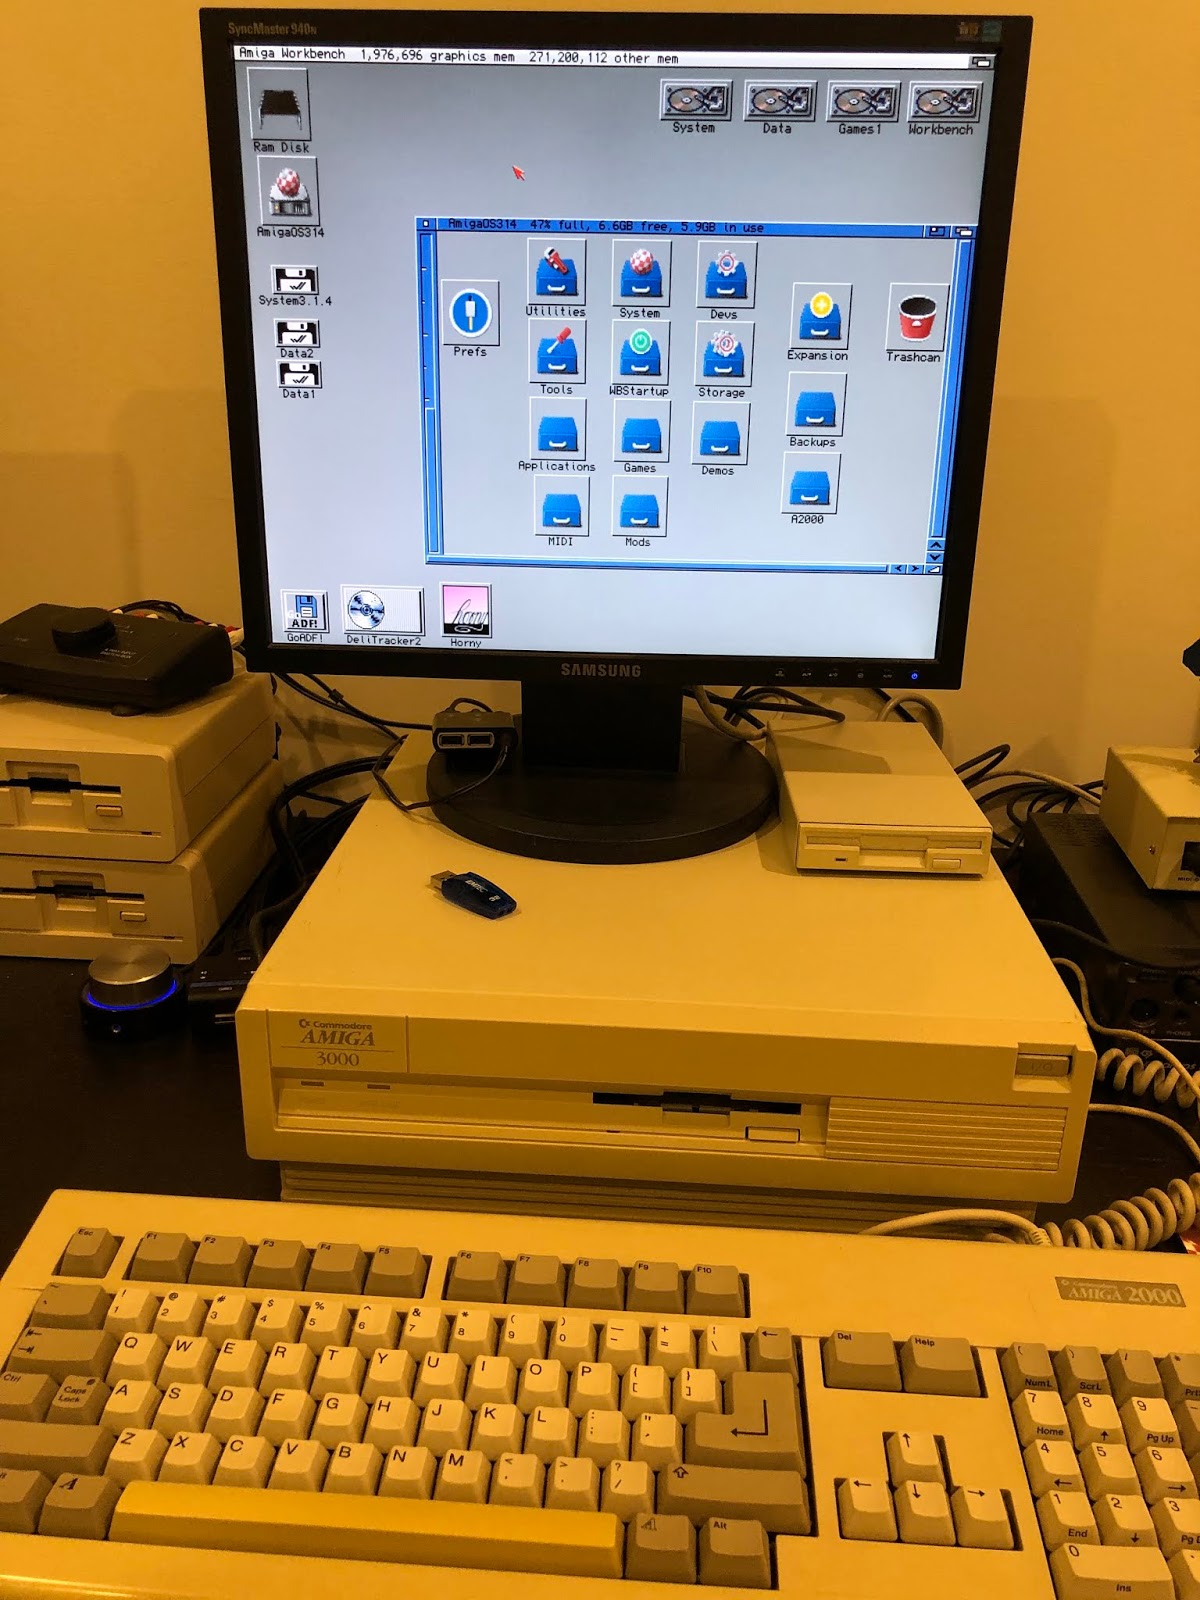
Here we are - AmigaOS 3.1.4 installed on my Amiga 3000 using superkickstart 1.4 - fantastic!


Next I installed the 3.1.4.1 update from floppy disk:

With that done and reboot completed, things are looking pretty good with AmigaOS 3.1.4.1 now running off the SCSI2SD:

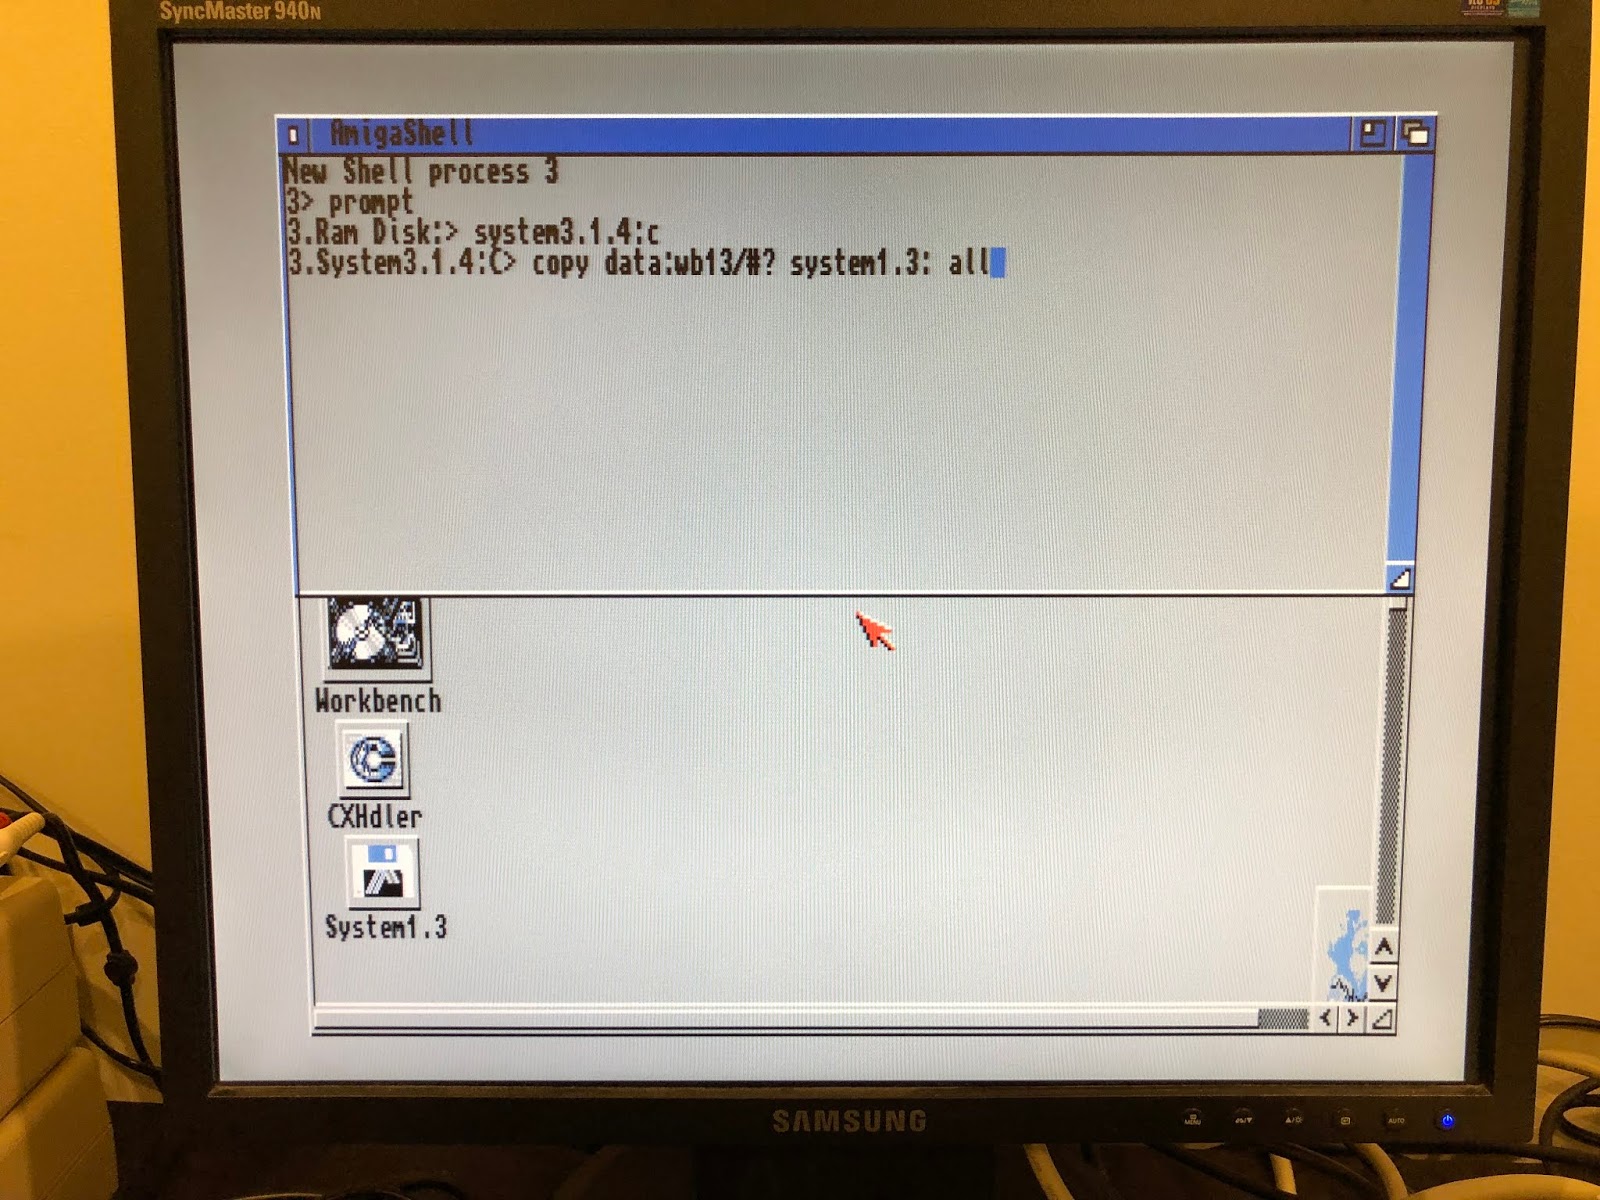
Next I copied my Amiga 2000 hard disk setup to the System1.3 partition, as I did on the 52MB SCSI drive back in Part 1:
While doing this I found a solution that allowed me to have my cake and eat it too! I saw that there is a SCSI2SD v5.5 in a small external SCSI 3D printed enclosure that can be simply attached to the rear SCSI port on the A3000, rather than using it internally and being unable to easily access the MicroSD card.
I ordered it from Inertial computing, and it soon arrived:

Looks nice and clean, and it is powered from the SCSI bus so no external power needed. The mini-usb port is to program the SCSI2SD that is inside. The other port is a MicroSD port for the drive itself.

Since I already setup the SCSI2SD parameters (which are saved to the MicroSD card) for the other SCSI2SD earlier, I can simply transfer the MicroSD to this new unit to try it out! Very convenient.
Here is the new SCSI2SD installed on the rear SCSI port on the A3000. I should get another one for the A2000!

The A3000 booted AmigaOS 1.3 and 3.1.4 just fine using the new SCSI2SD mounted externally!
Next up, I formatted the larger 12GB partition created earlier, now that AmigaOS 3.1.4.1 is installed and can "see" it.
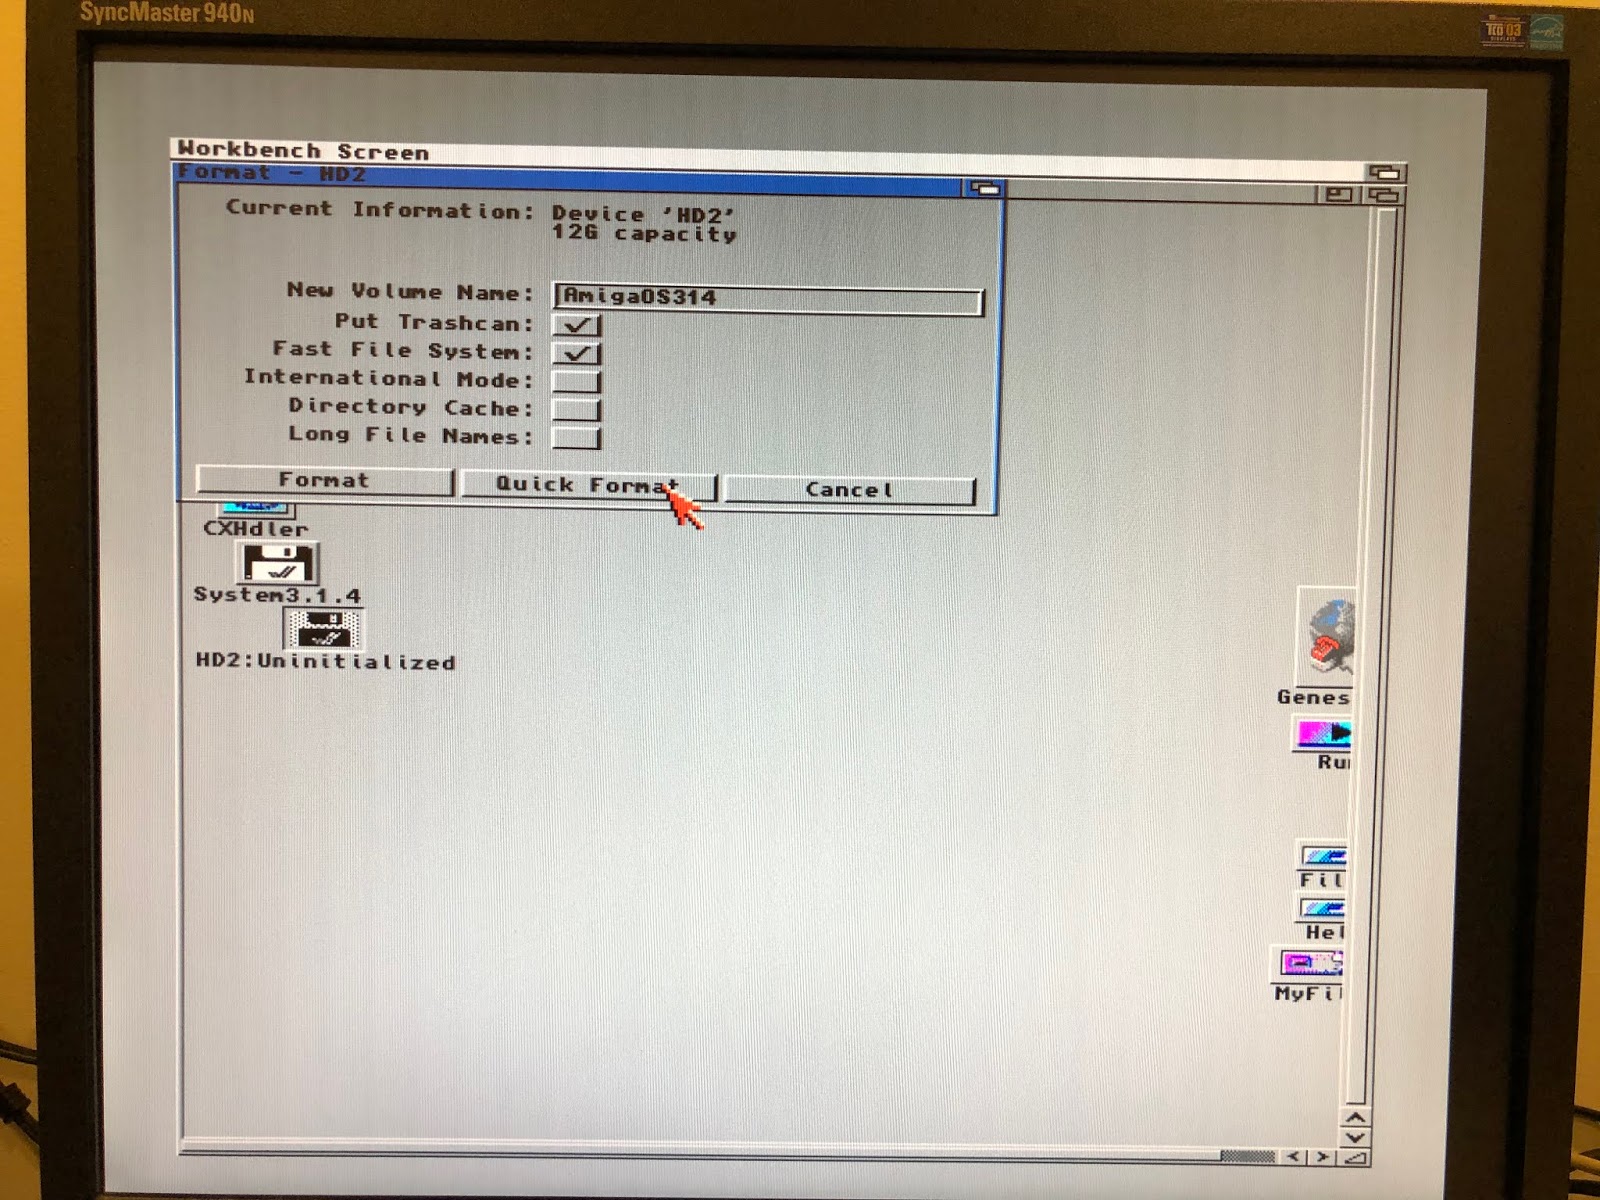
I then copied the contents of the AmigaOS3.1.4 partition to the new drive. I decided to do the same trick I did on the original 52MB SCSI drive, and transfer control to the larger 12GB partition to boot AmigaOS 3.1.4.1, rather than using the smaller partition. I labelled the new large partition as AmigaOS314:

This also gives me flexibility to boot the smaller drive if something goes badly wrong with the system on the larger partition. Here is the new startup-sequence I created on the original System3.1.4 drive to reassign the key assigns to the HD2 partition and then boot from it.

This is the same as what I did in Part 1 using the 52MB scsi drive using AmigaOS3.1 calling the CF card to boot the larger AmigaOS 3.9 partition.
On reboot, it all worked as expected, and now I boot AmigaOS 3.1.4.1 from the larger 12GB partition, using the WB_2.x to get it started and transfer control.
Here is the new partition list, including the CF card mounted on the Buddha IDE card (GDH0-GDH3).

I next transferred all the data from the CF card partitions to the new SCSI2SD card 12GB partition. Once completed I intend to remove the CF card from the A3000.
Whilel I was waiting for this I thought it a good time to make a backup copy of the Workbench 2.0 install disk set. I realised I only have the original disk set and no backup disks! It gave me a good excuse to fire up the A1000 next to the A3000 to do this with my favourite Xcopy Pro, which I set up a bootable disk for a while back for the A1000.

With that done, I next installed Picasso96 on AmigaOS 3.1.4 on the A3000, to make use of the PicassoIV graphics card - I noticed a strange yellowish corrupt on the normal inbuilt display which only appears on 3.1.4 - never seen this before now:

After the install completed and system rebooted, I could then select the 640x480 resolution in true colour (as I did in part 1), now running AmigaOS 3.1.4.1 - no issue with the screen now:

I installed Poseidon USB to get USB support, but I hit a problem with it when I allowed it to run automatically on boot - I kept getting constant recoverable errors, which was strange...

If I launch it after that manually from the Trident prefs program, it seems to be more stable. Not sure why that is, but not my biggest concern right now.
I commented out the PsdLoadModule loading line in the startup-sequence for now:

I later determined that the USB initialisation issue was the Buddha flash zorro card. Once I removed it the USB worked fine, as did my X-Surf 100 zorro card.
Next I copied the new Glowicons from the AmigaOS 3.1.4 floppy disk (as I did in previous AmigaOS 3.1.4 builds) to the hard disk on the A3000. With that done, and using PicassoIV RTG screen mode, I can finally enjoy the full colour glowicons as they were intended to be seen:

I then proceeded to install the rest of the PicassoIV, Concierto, Paloma TV, MUI 5 and other software as I did in Part 2 on the AmigaOS 3.9 install. I won't bore you with repeating those steps here.
What I will mention though is that the Horny midi sequencer does not work under AmigaOS 3.1.4.1 at all. It is expecting AmigaOS 3.5 or 3.9. Not sure how I should fix that yet...
I got sidetracked and did a little more work on the Workbench 1.3 environment (now that I have a lot more disk space) to install many original disk games I have to the hard disk! I could never fit them on my old 52MB SCSI drive on the A2000 back in the day, but now I can!

I noticed there is a F1 2019 update for the original F1GP on Aminet - Might have to put that on too! :-)
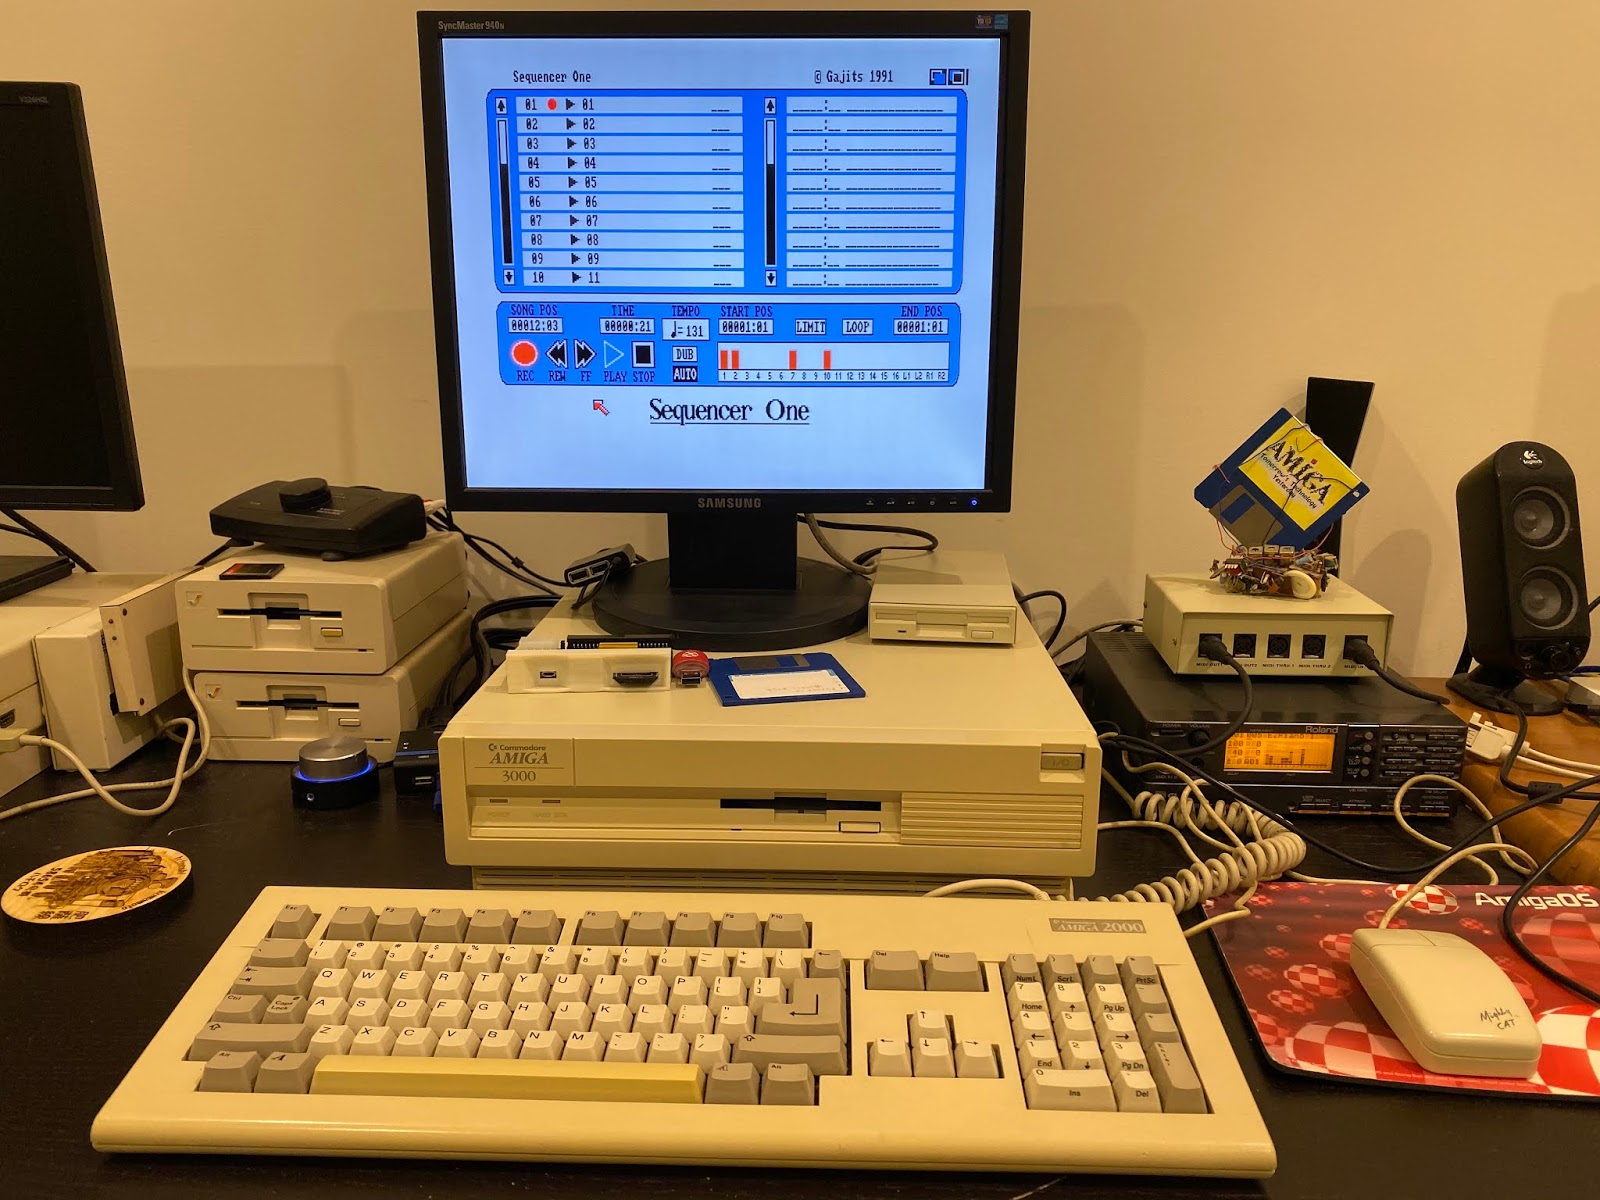
I also setup SequencerOne to use the Roland SC-88 MIDI Sequencer (via my Serial MIDI expansion) on the Workbench 1.3 side of the A3000. I tried out some MIDI files and it works great.
I decided to switch back to the AmigaOS 3.1.4 environment again and work on getting internet working next. As you might recall from Part 2, I couldn't get the X-Surf 100 network card working, and had to use the external Plipbox on the parallel port.
I want to fix this. Because this is AmigaOS 3.1.4.1 and not AmigaOS3.9, there is no Genesis/AmiTCP installed with it. This means I need to use EasyNet (AmigaKit), AmiTCP (with manual configuration) from Aminet, or try the other commercial option called Roadshow, which is also used under AmigaOS4.
I decided to try Roadshow (a commercial offering) for something different - I have never tried it on a Classic Amiga before. I purchased it from here and downloaded it from my Mac, and transferred via USB stick to the A3000.

With the installation completed, it reminds me that configuration is not yet done and needs to be completed to use Roadshow.

One disappointment with Roadshow (as a commercial product) is that it doesn't include a Preferences program to configure the settings. You have to edit the configuration files manually...frankly I am not impressed with that at all.
I followed the instructions in the installation.guide file to get things up and running. I already had the x-surf-100.device in my DEVS drawer, downloaded from the official Individual Computers icomp.de wiki page.
I manually copied the Roadshow X-Surf-100 netinterface file from the Storage/Netinterfaces drawer to Devs/Netinterfaces drawer using the Shell:

Why couldn't this have been handled in the installation?
I then edited the X-Surf-100 file to add in the manual IP address configuration by un-commenting the required lines and commenting out the DHCP configuration. In my experience DHCP doesn't work well (indeed at all) on Classic Amigas. YMMV of course:

I then needed to manually edit the router file in Devs/netinterfaces to specific the default gateway router for the internet.
I also configured the external Plipbox ethernet card by following the instructions, but didn't leave it in the devs/Netinterfaces drawer, as I don't want to initialise it on each boot automatically. I tested it though to make sure it works, and it did:

I then moved it to the storage drawer, as everything in the Devs/Netinterfaces drawer is mounted on bootup. To stop this just uncomment the addnetinterface line in the user-startup and run the command manually. I needed to do this as the system would lock up when trying to initialise the card automatically, preventing me reaching the Workbench screen!
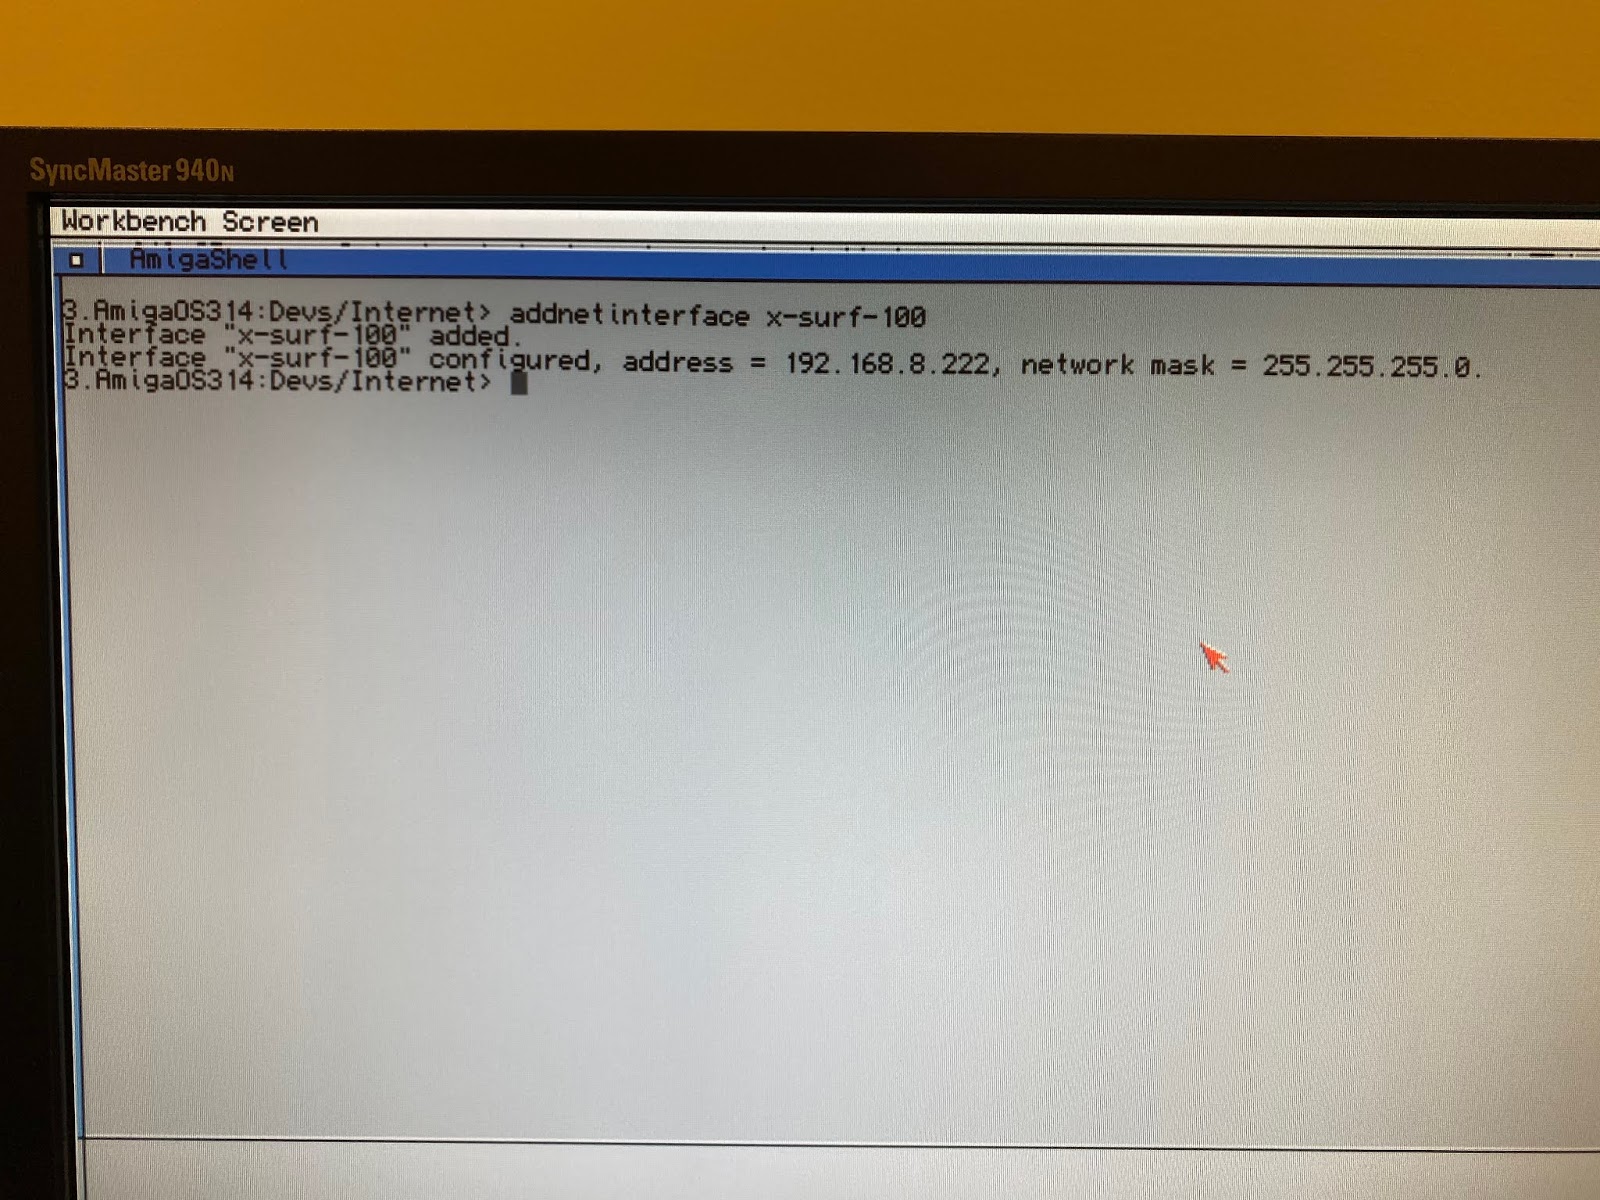
I then tried to manually initialise the X-Surf 100 interface from the shell as per the Roadshow instructions but it didn't work:

I eventually found the issue was the Buddha IDE flash zorro card (as mentioned earlier), so I removed it from the Amiga 3000 to try again.

I tried again without the Buddha card installed and it worked straight away:
I am glad to get the internet working on my A3000 AmigaOS 3.1.4 install using Roadshow, but it really should be easier to configure it.

I love the dual boot functionality of the Amiga 3000 running Superkickstart 1.4, allowing me to boot my old Amiga 2000 HD environment I setup on Workbench 1.3 back in 1991-1993, and also boot the very latest 2019 AmigaOS 3.1.4.1 release too!
Unfortunately this setup does mean I can't use my 060 accelerator with the A3000, since this means I have to lose the superkickstart 1.4 and replace it with the Kickstart 3.1.4 roms on the motherboard. The superkickstart roms can't use the 040/060 accelerators at all. It is limited to 030.
For now I have decided that I am happy enough with the Amiga 3000 setup like this, and will leave it at this point for the time being.
I hope this build has been interesting to read - I have really enjoyed doing this particular build!