Installing a Gotek Drive in my A500
Over the past few months I've been reading much about Gotek drives, and that if flashed with a specific firmware, they can be used on classic Amiga systems.
My main Amiga's an A1200 tower, and while that's packed with games that can be run via WHDLOAD I have two issues - the first being that not all games will run on my current set-up, and the second ia that my A1200 tower is a desktop machine, meaning that if I fancy some gaming I've got to do it sat at my desk.
I also have an Amiga 500 hooked up to a CRT TV via RGB SCART. The picture quality is A1, and I also have a nice big beanbag in front of the TV. This, I felt, was a prime candidate for a Gotek drive conversion. Now, the one thing I wanted to make sure I avoided during the conversion was making any modifications to the Amiga 500's case. I'd seen photos of users who'd replaced the internal drive with a Gotex, and had expanded the original drive slot to make the Gotek's buttons and USB slot accessible. This was something I did not want to do.
After a quick search on Ebay I found a seller who was not only selling a beige (well, you've got to make sure the colour scheme matches, right?) Gotek drive, but it was flashed and ready to run on Amigas. Perfect! I also found a user selling floppy power and data extension cables, so I got one of those ordered, too.
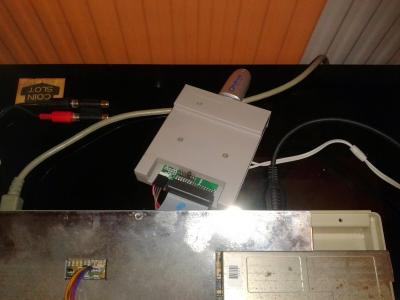
The drive arrived the following day, and keen to get the device tested I opened up the Amiga 500, disconnected the power and data leads from the floppy drive and hooked them up to the Gotek. The seller had warned me that if I saw '---' displayed on the digital display of the Gotek it meant that the USB drive I was using wasn't compatible. A couple of sticks later and I found an old 2gig USB stick I'd got from Play.com that worked.
 |
| My Gotek drive temporarily installed using the original floppy drive cables |
With a compatible USB stick found I then copied the SELECTOR.ADF file to the root directory, created a few sub-folders and copied a couple of ADF files over to those. I then powered the Amiga up and sat back.
A few seconds later I was greeted with the familiar blue Workbench screen, and then the Selector menu system loaded. From here it was simply a case of selecting the ADF image I wanted, the Selector program resetting and the game loading as if it were from floppy (this includes the same speed as if running from floppy!)
The following day the extension cables I ordered arrived in the post. It was now time to make a proper job of installing my Gotek drive in my Amiga 500.
Out went the old floppy power and data leads and in went the new ones. To keep the original floppy drive secure I was hoping to leave it in the A500 case, run the new cables on top of the drive and through the floppy disk slot on the side of the case. Unfortunately, while it seemed like a nice idea it was simply too tight a fit, and the top case of the Amiga wouldn't close properly. I popped the lid back off, removed the floppy drive and placed it carefully in the Screen Gems box the machine originally came in.
Next, I passed the floppy data and power cables through the floppy disk slot on the side of the A500 lid, placed the lid back on top, put the screws back in and hooked up the Gotex.
 |
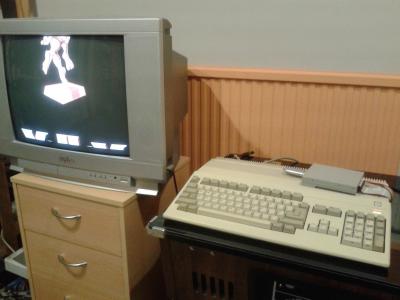
| Ocean's "Beach Volley". Panned by Amiga Power, but I love it |
As you can see from the above photo, having the Gotex sit outside the external case may not be as neat as situating it inside, but doing it this way I have an un-bastardised case, and it doesn't look much different from when I used to have DF1 sat on top of the machine.
I'm really pleased with my new Gotek setup. It's given my Amiga 500 a new lease of life, and at the same time it's meant I can play those classic Amiga titles without having to sit at my computer desk.
If you're interested in getting hold of a Gotek drive and wish to learn more I recommend you check out the below video from Kookytech. It covers everything you need to know about the device in an interesting and informative way.