All I want for Christmas is Rave
In September, having made three public releases of the Rave audio editor within three months, I felt I needed a little break from programming. I used the self-imposed leisure time to catch up with my reading, and so I finally managed to get through the latest issues of Amiga Future and Amiga Addict, which had piled up in my room since earlier this year. I also visited and had a lot of fun at the Amiga37 party in Germany as I reported previously.
But with the festive season approaching, I thought it would be nice of me to prepare a Christmas release. In AmigaOS4 quarters, there’s always a lot of eager expectation around Christmastime, and with operating system updates no longer being a given, the focus of attention has shifted to software releases. The developer has inadvertently become some sort of Santa figure, so I didn’t want to disappoint and leave my users’ stockings empty. My only problem was which features I could realistically implement within the relatively limited time frame. After some thinking I opted for two main new features to form the core of the 1.4 update, which I scheduled for 25 December (of course).
One particular feature that didn’t make it into the initial releases of Rave is resampling – that is, changing the sample rate (a.k.a. sampling frequency) of the audio data. I didn’t consider it top priority because the typical sound material of today is no longer a mixed bag of data formats and properties as it was in the 1990s. Music software like Audio Evolution or MilkyTracker will happily import sounds available from major sample providers such as Loopmasters, which makes resampling somewhat redundant. But as one user rightly pointed out in a forum comment, oldschool tracker musicians will be less thrilled because Amiga programs of the ProTracker kind often use audio data sampled somewhere between 8 and 16 kHz. I had to agree that producing “tracker samples” from modern-day sound libraries can be a challenge in the absence of a dedicated resampling function.
My readers will know that I develop Rave with the aim of bringing innovation to audio editing on the Amiga. Therefore, I’m on the lookout for whatever industry standards and good practices can be brought over from major platforms, rather than trying to invent my own half-baked solutions. For resampling, I had my eye on libsamplerate, a platform-independent C library that is known to provide high-quality sample rate conversions. I even found an old OS4 port of the library made by Varthall in 2008, but I got discouraged seeing that in order to use it I would have to either pay a licence fee of 1000 Australian dollars (ouch!) or release Rave under GPL (ouch! ouch!). Luckily, when I visited the author’s website I discovered that the licence had changed in the meantime, so I no longer had to worry about restrictions. The unstoppable Fredrik Wikström was quick to provide a fresh port, and in early December I started working on the implementation.
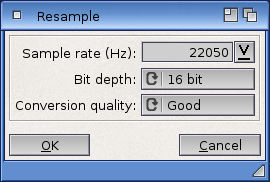
I wrote the Rave resampler as an independent program module, which can perform sample rate as well as bit depth conversions. I find this convenient because if you have, for example, a 24-bit / 44.1 kHz sample that you want to convert to 8 bits at 16 kHz, you can do this from a single GUI window (see above). The sample rate conversion supports both downsampling and upsampling, and libsamplerate really shines here. Unlike in most other Amiga audio editors, upsampling in Rave can actually improve the sound quality, as the library’s interpolation filters try to reconstruct the signal that would have been obtained by sampling at a higher rate.
There are four quality options to choose from, affecting the accuracy and speed of the conversion. “Best” is what it says on the tin, but it is really very slow: on a full-length audio track the operation can take several minutes, even on an AmigaOne X5000! On the other hand, the “Low” option (which triggers a converter based on simple linear interpolation) is very fast but sacrifices quality. The default setting is “Good” – a reasonable compromise between quality and speed. I should also add that the resampler module works asynchronously and doesn’t block the editor, so if the conversion takes longer than you would like it to, you can switch to another project and edit it in the meantime.
Concurrently, I was also working on the other feature that I had slated for inclusion in the 1.4 update. My aim was to rework and improve the Fade plugin. “Wait a minute,” some of you will now say, “what on Earth can be improved about fading? I thought it was just a simple function that produces a gradual rise or fall in the signal level?”
You’re right, you don’t have to be a seasoned sound engineer to have practical experience with fading. Whether you needed to remove that nasty click at the beginning of a sample, or wanted to give your song a nice smooth ending, chances are that you launched your favourite audio editor and used the Fade In / Fade Out function. If you used your Amiga to do this, I’m pretty sure that your editor produced a linear fade, leaving you with a signal curve that increases or decreases in a perfectly regular fashion. Something like this:
The problem is that while regularity will please a mathematician, the human ear may be less impressed. Have you ever felt that the fade-outs you apply at the end of your tunes sound a little too fast or abrupt, compared to songs you hear on albums? This is because your ears play a little trick on you. If you increase or decrease the signal level (which we perceive as volume) along a linear curve, the ear will hear it as if the sound level changes exponentially. Digital audio editors need to compensate for it if they want their fades to sound naturally. But do they – on the Amiga, I mean? Unless I’m mistaken, the only editor that lets you configure the fade curve is SoundFX, by way of applying a modulator:
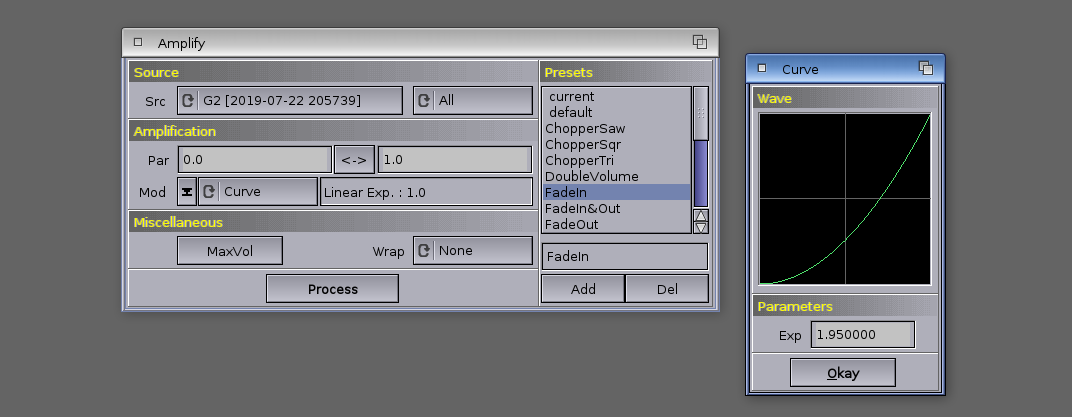
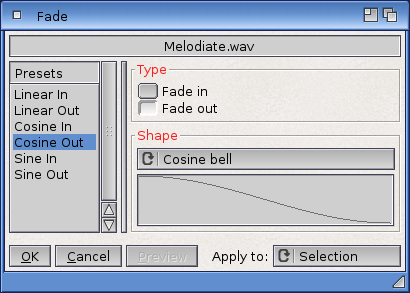
But this is all rather technical and clumsy to set up; I wanted something a bit more intuitive and easier to use. To start with, I introduced two pre-defined non-linear fade curves to complement the existing linear one. My favourite is the “Cosine bell”, which applies half of the Hann window function to the signal, producing a smooth transition between zero and full amplitude. An alternative is the “Sine lobe” (based on the Riemann window) with a slightly slower onset and more straightforward progression. I can imagine that in the future I’ll add a few more options, or even better, a control element to finetune the slope of the fade curve. But for the time being I’d say that the plugin does the job quite nicely – see the image below, which shows three different types of Fade Out applied to the same sample:

One more thing. As I wanted the new Fade plugin to be user-friendly, I thought it would be nice if the plugin window also provided a visualization of the fade curve, to give the user a better idea about the result. For this I wrote a custom BOOPSI gadget that displays simple shapes and curves. Nothing fancy at the moment, but I still find it a welcome addition. As Rave receives more functions and plugins, I expect the gadget to get more use in the program; for example, it could display various oscillator curves in future plugins that will generate sound through synthesis, or the like.
As any software developer will tell you, writing computer applications can often take unexpected twists and turns. So just when I though I had all the hay in the barn for version 1.4, I got a feature request from one of my users. Now, past experience has taught me to be very careful with feature requests and not try to please everyone. Because if you do, the development will soon lose focus and get out of hand. New features improve your program, but they also bring more work, add overhead, and postpone release dates. So I always try to ask myself first if a particular feature is really going to contribute and improve the workflow.
Moreover, users sometimes end up not using the features they have asked for. A software engineer once told me to beware of what he called “paratroopers” – random users who come out of nowhere urgently asking for a feature, only to disappear and forget that your program exists within a week. I made my own experience with a “paratrooper” years ago when I was working on the ADRipper CD converter, which I had taken over from its original author CentaurZ. A user I didn’t know asked for a new feature that required a great deal of rewriting of the program and its inner workings. I got burnt out in the process, the planned release had to be postponed by a year, and when I finally got it out the door the guy was no longer an Amiga user. A great lesson learned!
This time, the request was to add a timer that would measure and display how long it took to load or save a file. Despite seeing the potential benefit, I meant to dismiss the request for the time being because I didn’t want to jeopardise the Chrismas Day release. But the user, Mikael, promptly sent a donation through my Ko-fi page to show me that he was serious about it, and we started discussing the feature on Discord. The implementation of the timer wasn’t a problem; the problem was where exactly to display the reading in the program GUI. Mikael suggested an information requester but that wouldn’t work because Rave is asynchronous. In a multi-project session, operations can take place simultaneously in the background, so a requester could cause confusion about which project it actually refers to. But I promised to give the matter some more thought. The following day I came up with the idea that each project would keep an activity log to register all operations (not just loading and saving), including the completion time. The Project Information window seemed to be the most logical place to put the log in, so this is where it went after a quick redesign:
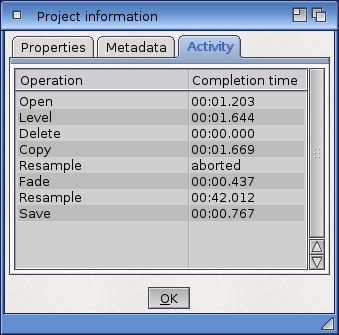
And I must say that I grew to like the new feature soon! It’s very handy for testing and comparing the program performance on different OS4 systems – I wonder why I never thought of it before and instead bothered with a stop-watch?
Anyway, it’s past 7pm now and it’s high time I uploaded Rave 1.4 on OS4depot. I hope you’ll enjoy the new version, and I wish you all a very happy Christmas! Stay tuned for more updates in the new year!