The Kickstart switcher from hell
or: How not to build an electronic device
Learning from this little case study might save the beginner some hours of mistakes and wasted experimentation. A Kickstart switcher for an Amiga 500/600/2000 computer is not a complex device, so for many aspiring hardware developers it's one of the first projects to try. I was one of these.
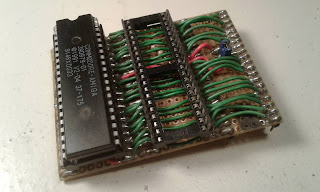
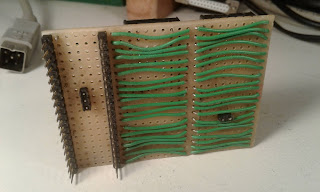
A couple of years ago, my intention was just to build something usable for the Amiga, and not waste a lot of time on research and obtaining material. A Kickstart switcher quickly came to mind, and it looked as if - with some extra manual work - my initially very limited set of tools and components would be sufficent to get the job done. All I used for the Kickstart switcher is: some drilled circuit board, 2x DIP IC sockets, wire, single-row pin headers, 2x jumpers, and a resistor. I think I got the schematics from AmiNet.
Cutting a lot of short pieces of wire, and using tweezers to put them into place didn't scare me - here's what I came up with:
 |
| Well, it's undeniably a Kickstart switcher. |
Let's start with the positive aspect:
It cost very little, and any electronic components dealer probably has the required components in stock at any time.
But that's really about it - and this is where the "hell" part comes in:
Using a single sided drilled circuit board doesn't make planning exceptionally easy. A Kickstart switcher requires a lot of signals to be passed from one IC to the next, which using plastic-coated wires requires an unusual amount of space on the circuit board.
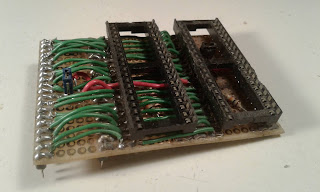
I figured out I had to do the routing on both sides of the board, and have lots of wires cross lines of IC pins and solder pads. Also there would be a certain order required which part to solder before adding the next one.
I was ambitious and wanted to build a compact, small board.
Which turned out to be... interesting.
I started having doubts about my design when pulling the wires under the first IC socket, and soldering them to the second one. This was extremely tedious: the wires are a little too stiff for such short lengths, and needed to be soldered almost underneath the second IC socket. So there was very little room to work here, with stubborn hot wires and hot solder slipping around. I frequently touched plastic parts or wire insulation with the solder iron, leaving ugly markings.
After the doubts came the hate.
When I accidentally dropped some solder on one of the inner wires I had already done, and wanted to fix it, it came loose. I quickly realized this was near impossible to fix without damaging either plastic parts, or touching solder nearby, which would make one of the other stiff wires come loose. My morale was sinking, but I went on, and after some serious fiddling I managed to fix and finish the solder work.
Or so I had thought...
 |
||
| This looks quite tidy. But it's the devil's work. |
Then I checked with a multimeter for shorts. Everything looked flawless from visual inspection, but then... BEEP! What? I really wasn't expecting this. You'd probably expect a short to happen with solderpads next to each other, but I had accidentally touched opposite sides of IC pin rows, and the multimeter had beeped... ?!
It took me a little while to find out what was going on.
And I hated myself even more.
With all the space saving considerations, all the wires were now in-line with all solder points. I had been soldering the bottom side wires to the board first. So what was happening was: When I soldered wires from the top side of the board, the hot metal wire would stick through the drilled board, and melt the isolation of the bottom side wire below it, creating a short.
Great. Quality design.
Well, eventually I finished the damn thing, and tested it.
Today, I still don't know if it works properly, and I don't want to. It might have fried the 2.04 ROM chip you can see in the first picture - it creates a red bootscreen on the Amiga.
It was a little, interesting journey, but I'm through with this Kickstart switcher.
Now it sits here on my desk, as a grim & funny reminder of how not to build an electronic device, especially not a prototype.
It all comes down to basically one important lesson learned: Leave some space! If you build such a thing, always add a couple of extra millimetres here and there as working space, for corrections, unexpected wire, or just to simplify visual inspection. Being a little generous with space might save you a lot of time, and from getting unusable results.
 |
| "Kickstart switcher from hell" |